


We independently evaluate all recommended products and services. Any products or services put forward appear in no particular order. If you click on links we provide, we may receive compensation.
 At KnifeInformer.com we know that owning a knife with a dull blade is like a having a gun without bullets! Thankfully, today's high-tech knives made from high-end stainless steels are typically insanely sharp right out of the box. Many will hold their edge for years to come but this is obviously a function of how the knife is being used and how much abuse it has been subject to. At some point, however, every knife is going to need to be sharpened if you want it to remain effective. In this article we explain how to sharpen your pocket knife.
Today, knife sharpening can take many different forms and methodologies. There are a ton of how-to guides and videos out there explaining different ways of sharpening and an equally large number of products on the market - ranging from cheap $5 gadgets to state-of-the-art machines which will run you $1000+.
Of course, there is no right or wrong approach to sharpening your knife and ultimately it boils down to what you feel most comfortable and confident with. We should also note that a particular type of sharpening method will not always suit every different type of knife. Knives are unique instruments that in many cases require a unique approach to care and maintenance.
That said, the information we provide below is generally aimed at your EDC pocket knives and does not require any form of advanced knife handling experience.
What you need to sharpen your knife
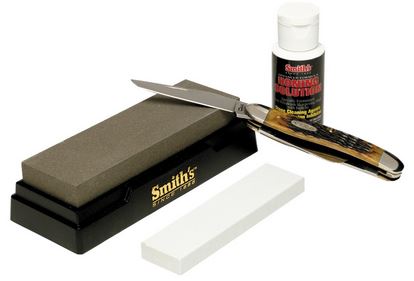
The good news here is that there are essentially only two pieces of equipment needed to sharpen your pocket knife. The first is a sharpening stone and the second is some form of lubricant.
The sharpening stone is what will do the majority of the work to give your blade a sharp edge. As you'd expect there is a mind-boggling array of different sharpening stones on the market but most of them come with two sides - a rough and fine grit. There is an equally wide price range for these stones but in general you don't need to break the bank here - something around the $20 range will be more than adequate to tackle your typical folding knife. Check out our guide to the best knife sharpening stones for some recommendations on what to buy.
The lubricant also comes in many forms but the basic concept here is that it will help to limit the amount of heat produced from the sharpening process. This heat can ultimately damage your knife so it's important to keep it to a minimum and that's where the lubricant comes into play. Now you can still sharpen without lubricant but overall we do not recommend it unless you really have to.
In fact, it's worth noting that some stones specifically do not require any lubricant so make sure you read the instructions. Similar to our comment on the sharpening stone it's generally not necessary to splash out on the cutting edge here. Click here for some inexpensive lubricants we recommend.
Steps to sharpen your knife
The following steps describe how to sharpen your pocket knife. If you prefer a video guide then this is a great example from YouTube:
1. Lubricate the sharpening stone.
Apply a thin layer of lubricant to both sides of your sharpening stone. Simple.
2. Sharpen one side of the blade using rough grit.
Angle the knife blade about 15 degrees against the rough grit side of your sharpening stone. Note the recommended angle varies depending on what type of knife you're sharpening and how sharp you want it but in general you can stick with anywhere from 10-15 degrees for your standard pocket knife. The smaller the angle the sharper the blade will be but at the expense of poorer edge retention. In other words, a greater angle will be less sharp but last longer.
It's vital to try to maintain this same angle while you sharpen and this isn't easy. Naturally, practice will make perfect so don't expect to be good at this from the outset. You'll get there eventually and if you get fed up and need help consider using a sharpening guide which is a cheap but handy tool for maintaining that constant sharpening angle.
Once you are comfortable with your angle then begin to stroke the blade against the stone. You can bring it towards you or away from you and that is really down to personal preference. You don't need to use a great deal of pressure here, a light-moderate weight is adequate and try to keep the pressure somewhat consistent across strokes. Move the blade as though you are trying to shave a thin layer of stone off the sharpening block. Repeat this process for about 10 strokes.
3. Repeat on the alternate side.
You get the idea - simply repeat step 2 on the opposite side. Technically you should continue to sharpen until you have raised a burr, which is occurs when one bevel is ground until it meets another. The burr is like some frayed material hanging off the end of where it was ground. It's weak so you don't want it on your edge because it will break off. If you hold the edge up to bright light you'll see a highlight along the edge which is not present on the other side.
4. Stroke alternate sides
After you've focused on each side then perform another 10 or so strokes but this time changing the side on each stroke.
5. Repeat steps 2-4 using the fine grit.
Once you're done with the rough grit you simply need to repeat the process using the finer grit side of the sharpening stone. This will remove your burr created during the rough grit phase.
Voila! Enjoy your newly sharpened knife.
Each time you sharpen the same knife make sure you use the same angle you used before. Mixing up the sharpening angle is generally not recommended. Using the same angle repeatedly is far more important that specific angle itself. In order to test the sharpness of your blade try carefully cutting some paper sheets and monitor how easily the knife makes the cut.
Next, using caution you can attempt to shave some hairs off your arm (please be careful!). Finally, clean your sharpening stone after you're done. Any small steel particles left on your sharpening stone can eventually lead to rust if not cleaned up properly.
There...you just learned how to sharpen a pocket knife! Stay sharp, stay safe.
